Provisioning and Change Management Automation in GoodData Platform
Version Compatibility Notice
The content of this article is valid for the version of GoodData that was current as of 17 June 2021. Features or behavior in newer versions may differ.
Introduction
Lifecycle management (LCM) is a set of features in the hosted GoodData Platform that allow you to easily automate the provisioning of workspaces and users and handle change management. In this article, we’ll explain how these features work and show you examples of typical deployments.
Parts of LCM
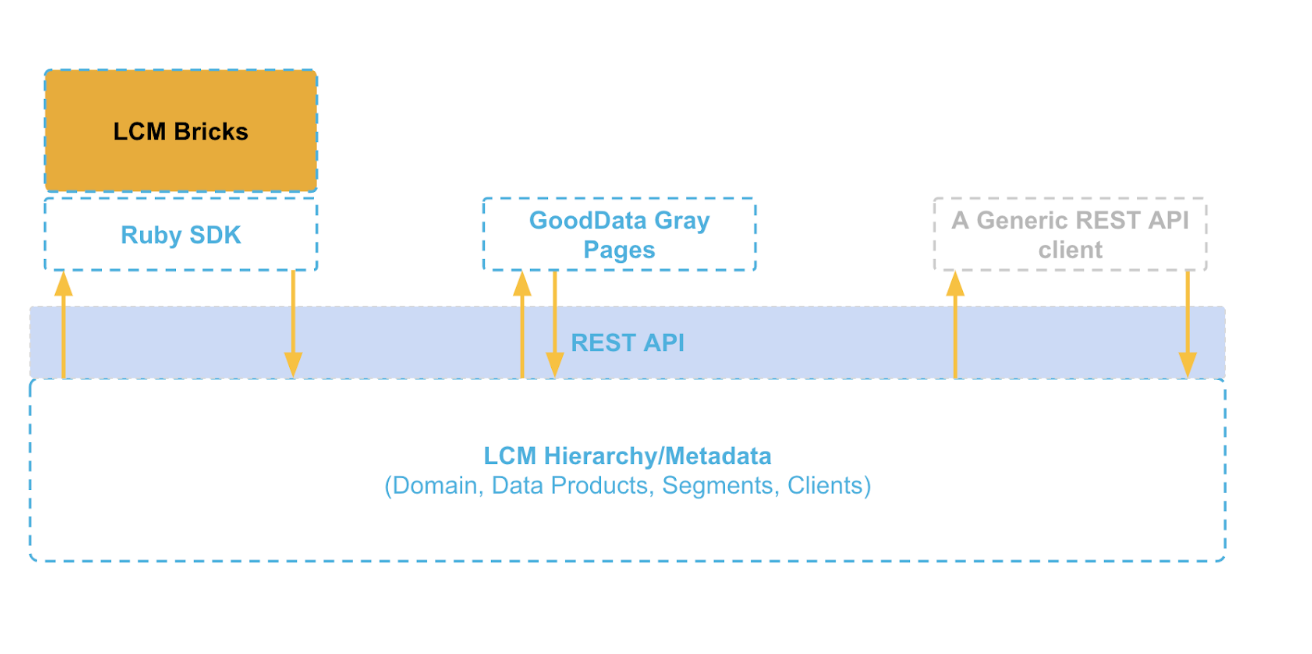
In GoodData, LCM has several different parts. At the lowest level, it’s a hierarchical organization of workspaces. Then there are REST APIs that allow you to manipulate this structure. On top of the APIs is Ruby SDK that makes it easier to work with the APIs, and on top of that are so-called LCM Bricks - which are simply packaged pieces of code that fulfill specific functions - e.g., the Workspace provisioning brick manages workspaces in the LCM hierarchy. GoodData provides you with these bricks and allows you to easily deploy and configure them so that you don’t need to write scripts over the APIs to perform certain common tasks. For most of the customers, using the bricks is preferred over implementing custom processing over APIs, so we’ll focus on the bricks.
LCM Hierarchy
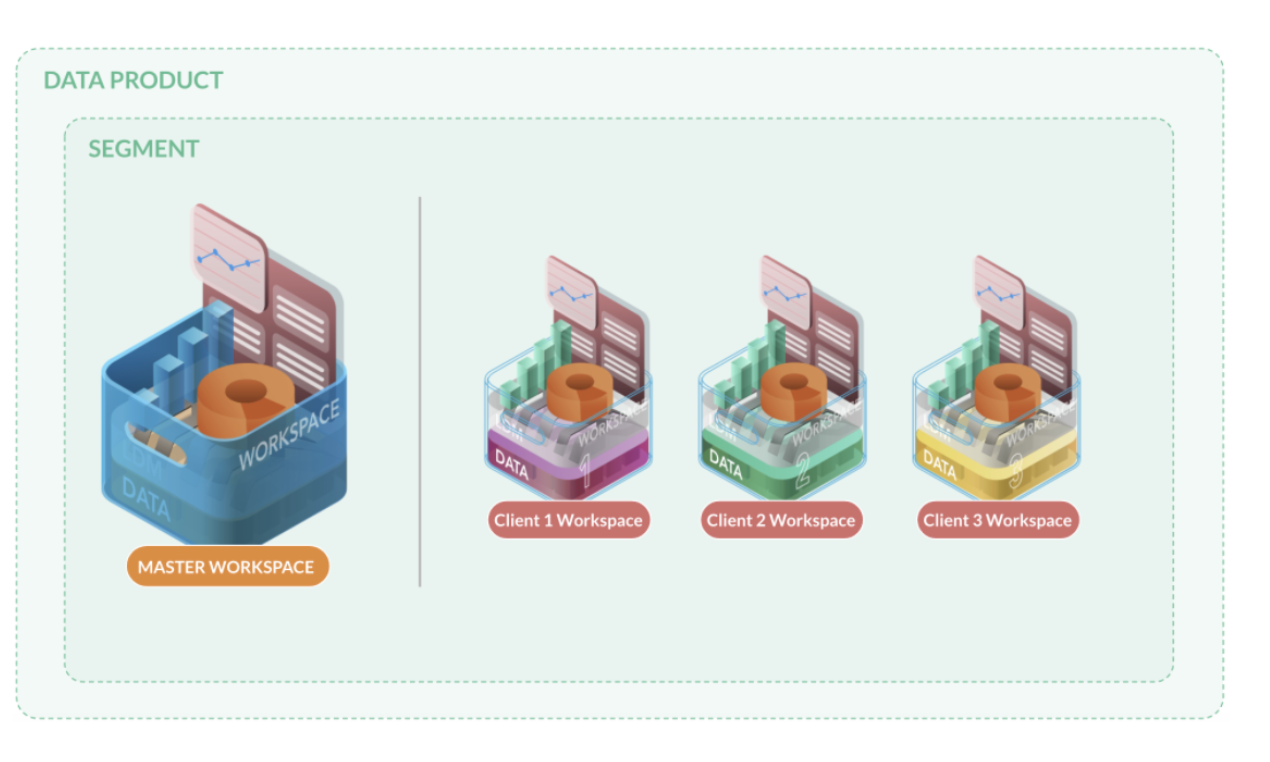
As mentioned before, the most low-level part of LCM is the LCM hierarchy - or metadata. It allows you to organize your workspaces into so-called Data Products and Segments. A Data Product is a wrapper for one or more Segments. Segments live within data products and can be thought of as a flavor of the same data product - you could, for example, have a basic and a premium segment within your data product where the premium segment would contain more dashboards than the basic one.
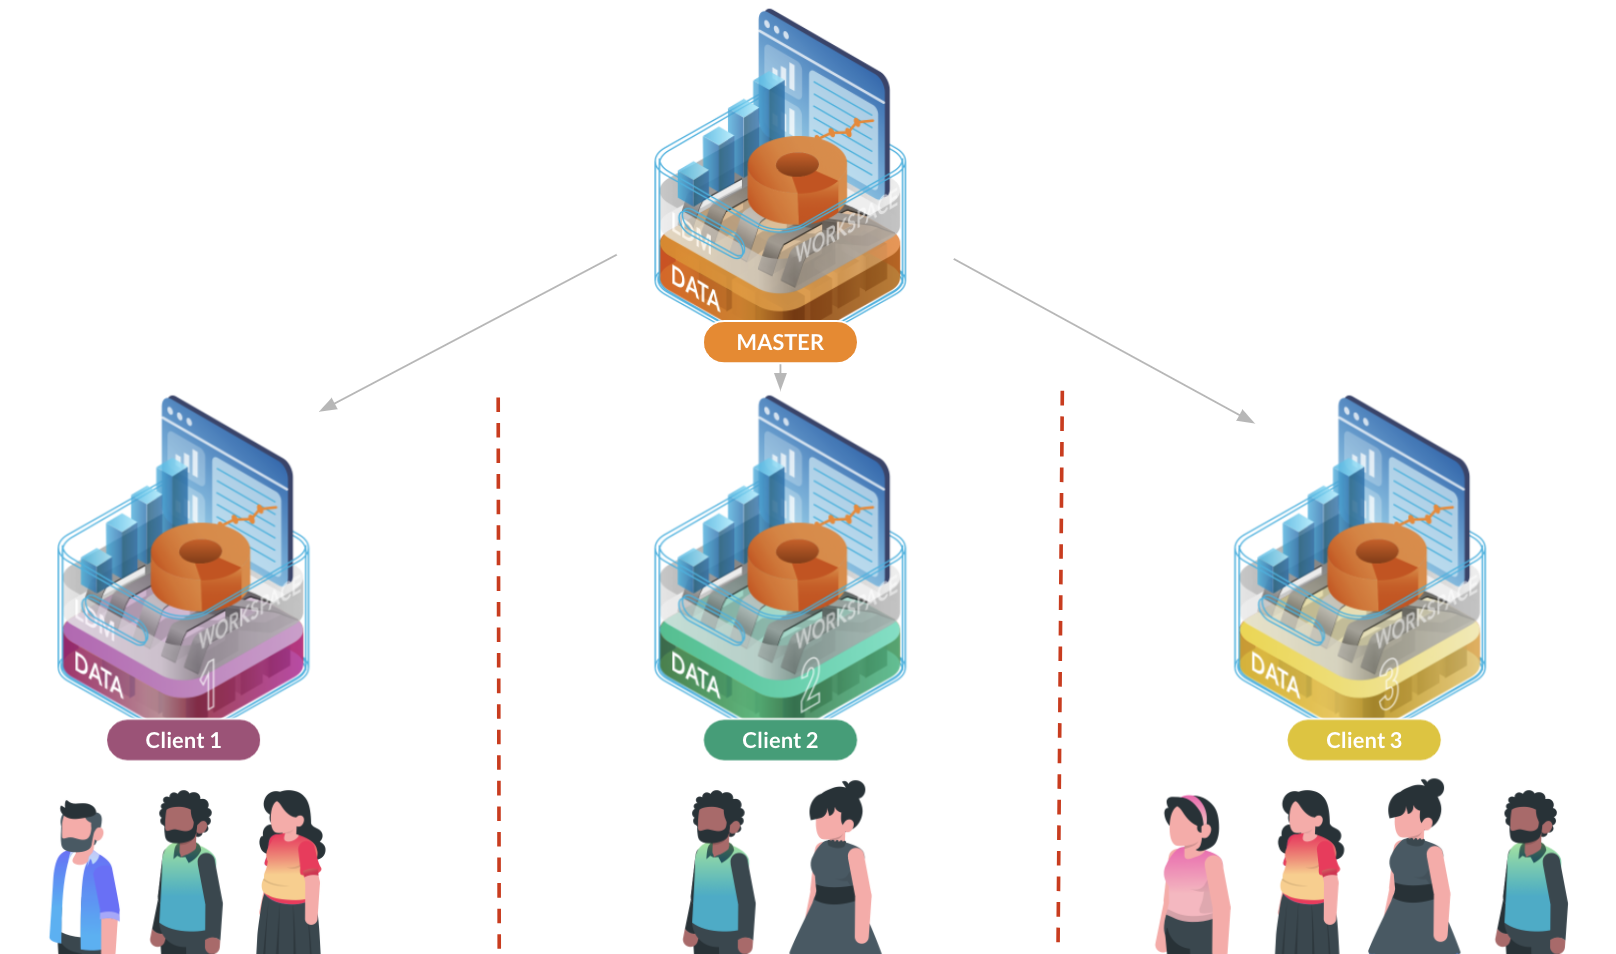
Each segment contains precisely one master workspace and an arbitrary number of client workspaces. Client workspaces inherit the master workspace’s LDM, dashboards, insights, and measures but are loaded with “client” specific data. Workspaces are isolated from each other which means that users only see the content of workspaces they are invited into.
You’d typically have one client workspace for each of your customers or teams - so you’d want each workspace to contain only the specific client’s/team’s data. For the purpose of explaining how LCM works, let’s assume we have just one Data Product with a single Segment as in the picture above.
LCM - Provisioning
One of the goals of LCM is to simplify batch management of workspace. This means simplifying provisioning/de-provisioning of possibly thousands of client workspaces within a segment as well as creating users and assigning them to workspaces. This is done using LCM bricks. Specifically, these three:
- Provisioning brick - takes care of creating & deleting workspaces
- Users brick - takes care of creating & deleting users as well as assigning users to workspaces and updating their roles if needed
- User filter brick - if you are using data permissions in your solution, you can use this brick to manage those.
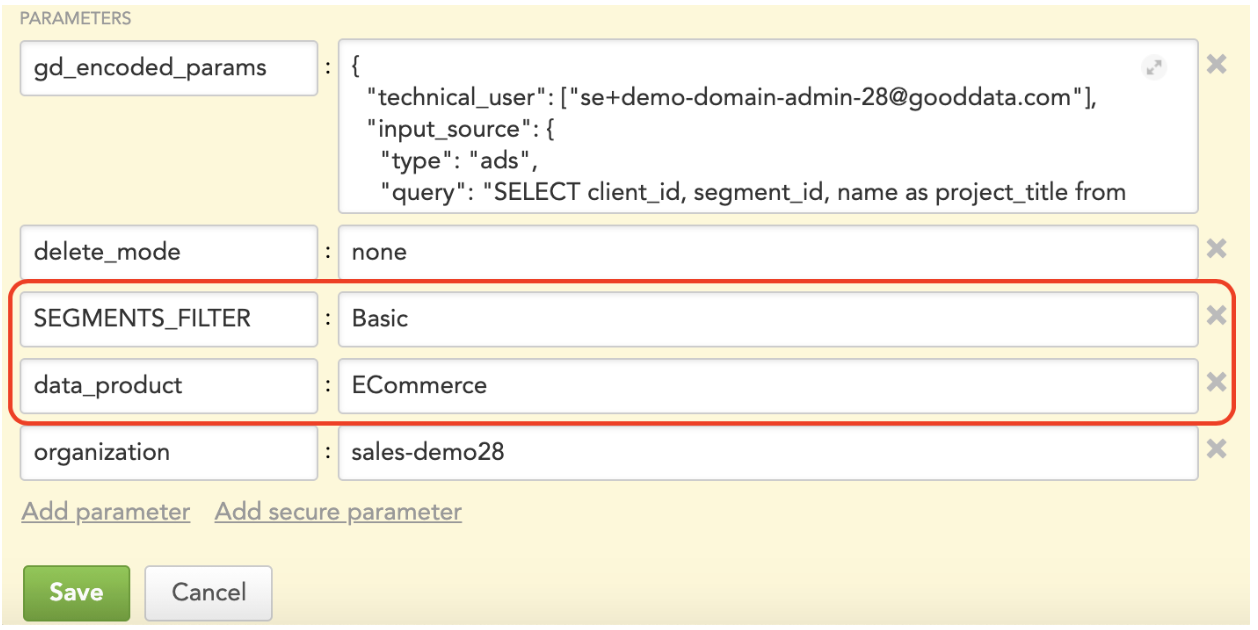
Let’s take a closer look at how the workspace provisioning brick works. When you deploy the brick, it requires several parameters. Amongst others, you specify your data product and segment names.
This tells the brick for which data product and segment(s) it should be managing workspaces for. Additionally, you need to provide the brick with a list of workspaces you expect to exist in the segment. The brick can read the data from many different sources; in the example below, it pulls the data from a table in the GoodData’s Agile Data Warehousing Service (ADS, for short).
An example of the data it would read could look like (“project” is an older term for a “workspace”, project_title means workspace title):
When the provisioning brick runs, it reads the configuration and the data and:
- If there are workspaces listed in the data that don’t exist on the platform, the brick provisions new client workspaces from the segment’s Master workspace. The new workspaces will get the corresponding titles and client_ids assigned. The client_id becomes an external identifier of the workspaces. The client_id column has to contain unique values in the data.
- Optionally the brick will remove any client workspaces that exist on the platform but are not listed in the data.
The configuration of the user brick is very similar. The data it would read could look like:
When the user provisioning brick runs, it reads the configuration and the data and:
- Creates user accounts for new users
- Gives users access to specified workspaces (workspaces are identified by client_id)
- If the user’s role in the workspace is different than specified in the data, updates the role to the one in the data.
- Removes users from workspaces if they are not associated with the workspace in the data
User filter brick works similarly, but as data permissions are not used that commonly, we won’t go into the details here.
Typically we deploy the provisioning bricks in a series like this:
- The process that updates data for provisioning bricks (this is typically a custom ETL process)
- Workspace provisioning brick
- User provisioning brick
- (optionally) User filter provisioning brick
How frequently you run the whole chain depends on how frequently you need to provision new workspaces, users, etc.
LCM - Change Management
Another function of LCM is to simplify change management. Let’s assume that you already have a segment with a bunch of client workspaces provisioned on some v1 version of the master workspace. Later you receive feedback from the users, and you want to make some changes to the dashboards/insights you are providing. LCM allows you to develop and test your updates in a separate set of workspaces and easily apply them to your production workspaces once you are ready.
There are two change management bricks:
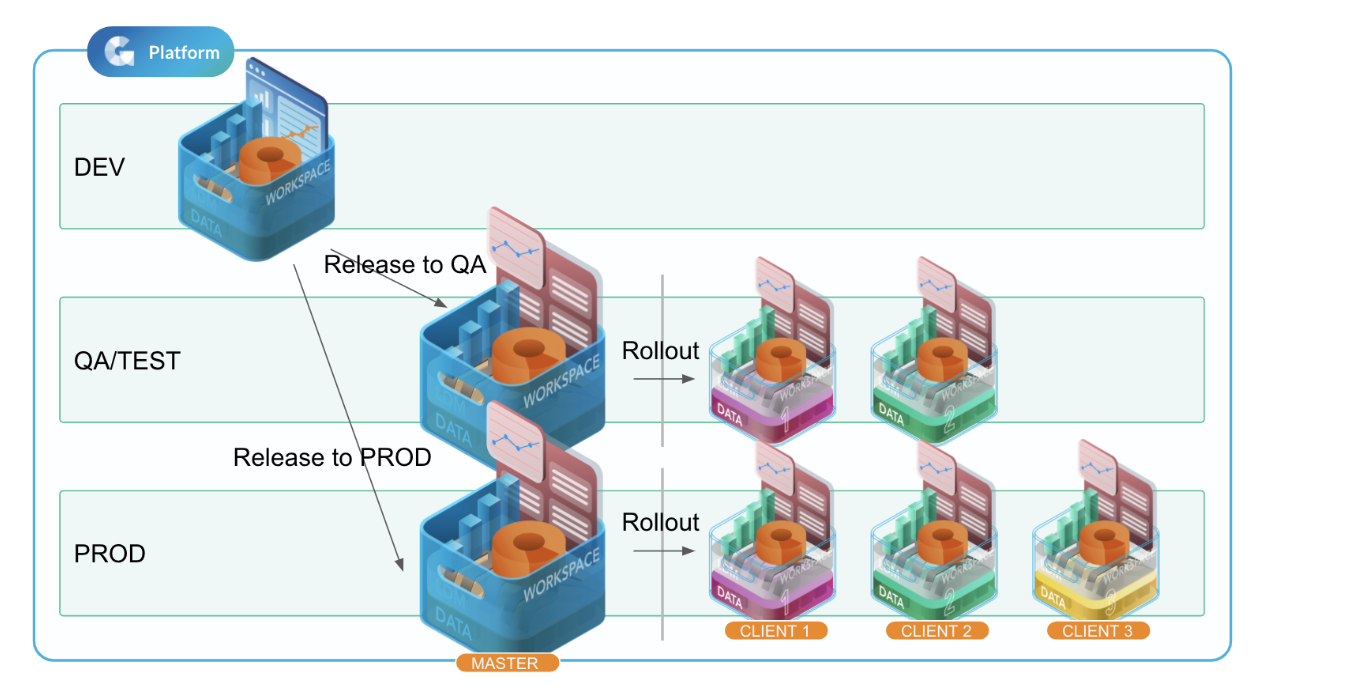
- Release brick - creates a new master workspace from a development workspace for a given segment.
- Rollout brick - updates existing client workspaces to match the new master workspace.
Let’s take a closer look at what exactly the release brick does. Similarly, as with the provisioning bricks, you configure the brick to know what data product and segment to work with. You also point the brick to a so-called development workspace. This is a workspace that you want to use to create a new master for the segment off of. This development workspace can be located on the same domain as your target segment or - more commonly - a different one. We’ll illustrate the deployment options below. When the brick runs, it creates a new workspace that is a replica of the development one in the domain the brick is deployed in. The brick behaves a bit differently based on whether the target data product and segment already exist or not:
- If the target data product and segment don’t exist yet, the brick will create them. It will also immediately set the new workspace to be the new segments’ master. Once this is done, you can start running the Provisioning brick to provision workspaces under the new segment. There is no need to run the Rollout brick next in this scenario but it also won’t hurt anything if you do.
- If the target data product and segment already exist, the release brick will keep the old master workspace in place. Instead, it will only add a record to a so-called “LCM_RELEASE” table or file, noting that a new candidate for a master workspace for a given segment was created. To actually promote this candidate to a new master and update existing client workspaces, you need to run the Rollout brick next. This gives you an opportunity to visually check the newly provisioned workspace and make sure everything looks as you’d expect before you roll out the changes to all the client workspaces.
Now let’s talk about what the Rollout brick does. The rollout brick will take a look into the LCM_RELEASE table/file to see if there is a new master candidate for the managed segment(s) ready. If it finds one, it will promote it to an actual master and push any changes to all existing client workspaces. The old master workspace won’t be deleted; it will just get disconnected from the segment. That way, you have the older version of the master workspace around in case you need to revert the changes. You can manually delete the old masters any time you want.
Note on customizations of client workspaces: We mentioned that the client workspaces inherit from the master workspace. That is true, but it’s important to realize that they don’t have to be exact clones. While the LDM of all workspaces in the segment has to be the same, the end-users can build custom insights and dashboards in the client workspaces. This custom content won’t get removed by the rollout action unless you are rolling out incompatible/destructive LDM updates (for example, you are removing an attribute the end-users are using in their custom content).
The change management bricks are to be deployed in a series like this:
- release brick
- rollout brick
These bricks don’t need to run periodically, we typically trigger them ad hoc as needed. Just note that you don’t want any processes like provisioning or data load to be running when you are updating the segment to prevent conflicts (e.g., trying to load data into a dataset you are trying to delete).
Let’s take a look at two most common ways in which you can set up the change management processes.
Change management setup with single environment/domain
The simplest scenario is that you have both your development workspace and the target segment in the same domain (in this case, PROD). This is easy to set up but it also means you need to give all your developers access to the production domain and the domain gets cluttered with non-production workspaces. This might lead to a higher risk of accidental updates to the production, etc.
Change management setup with multiple environments/domains
This is the setup we use most frequently when implementing solutions for our customers. You have three GoodData domains - DEV, TEST, and PROD. The DEV domain is used exclusively for the development of new analytics features and contains the “development” workspace.
The TEST (sometimes called QA) domain is optional. When used, its purpose is to:
- Do validations/QA on the provisioned sample client workspaces (checking calculation logic, etc.)
- User and acceptance testing on the provisioned sample client workspaces
- Testing of the release/rollout procedure itself - this is usually not needed but can be useful when releasing a large amount of backward-incompatible changes (e.g., destructive LDM changes)
The PROD domain is the production domain that contains the actual end user-facing client workspaces.
The update then proceeds like this:
- Run release/rollout from DEV to TEST domain & perform any tests needed.
- If issues are found, fix them in the development workspace in the DEV domain.
- Repeat steps 1 & 2 until all issues are resolved.
- When all tests pass, do a release/rollout from the development workspace to the PROD domain.
The multi-domain setup has the following advantages:
- Only a small subset of people need to have access to production. Most of the developers can only have access to DEV and TEST domains, limiting the possibility of accidents.
- Having separate URLs and credentials makes it harder to make a change by accident to the production workspaces - it’s harder to accidentally log into production and make unwanted updates.
- It’s easier to keep the production domain clean as you don’t have to clutter it with development users, workspaces, and processes.
- The domains often have separate resource pools - running resource-heavy processes on one doesn’t tax the other.
Summary
In this article, you learned what is LCM in GoodData and how you can leverage it to automate provisioning and change management for your workspaces.
The two change management setups we introduced at the end of the article are the two most commonly used but the bricks can be configured in any way you need.
To learn how to deploy and configure the bricks refer to the documentation. One thing to note is that all processes need to be deployed under a workspace. It is recommended not to deploy these housekeeping processes under the master workspace - all processes you deploy there will be copied to all the client workspaces. We typically create an empty workspace we refer to as a “service workspace” and deploy all these processes there.
